Bread dough is a much more complicated matter than you would think. It is almost sience, therefor here is a list of facts and interesting tidbits about bread dough.
There are various techniques for making yeast dough. What makes a good dough:
Good gluten development
The elasticity and stretchability are determined by a good gluten network.
The proteins in the wheat must form a strong network to retain the yeast gases. You check this after your stretch and folds with the windowpane test:
Pick a small piece of dough with wet fingers. Gently pull it apart into a thin membrane.
Good dough: You can almost see through it without the dough tearing. Does it tear immediately? Then the gluten does not yet have enough structure and the dough needs more rest or folding.
Sufficient gas development (Airiness)
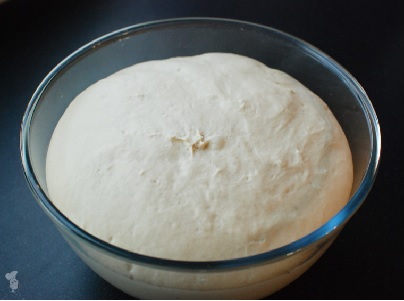
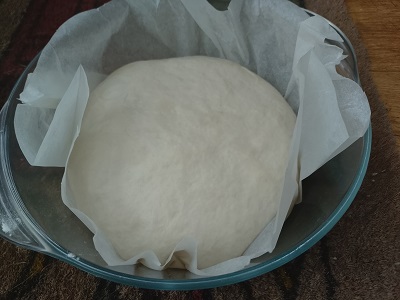
During the long rise in the refrigerator, the yeast must do its work. The dough must have visibly increased in volume (often almost doubled). The top is slightly convex and if you look closely (especially in a glass bowl), you will see dozens of small and large gas bubbles beneath the surface. The dough feels 'bubbly' and light.
Sufficient skin tension (Shape retention)
This is crucial for wet dough. Without tension, the bread immediately spreads out into a flat disc in the oven. After shaping (the envelope fold), the outside of the dough ball should feel smooth, firm, and elastic. If you very gently press a small indentation into it with a floured finger, the dough should spring back slowly and partially. Does it spring back very quickly immediately? Then it needs to rise longer. Does it not spring back at all and does the indentation remain? Then it is over-risen.
The right temperature and hydration
It may be shiny and sticky (especially at 82%), but it should not feel 'liquid' like water. Due to protein, the dough absorbs water and should feel like a cohesive, silky-soft mass that is resilient. After the refrigerator rise, it should be cold and firm enough to be manageable with a little flour on your hands. If your dough shines after the stretch and folds, is full of bubbles after the refrigerator, and holds its round shape for a moment after shaping, then you have a perfect dough!
The bakery tools we need are:
a dough scraper/cutter
workspace to kneat the dough
kitchen scale
optional a bread baking machine to make the dough
CONCEPTS
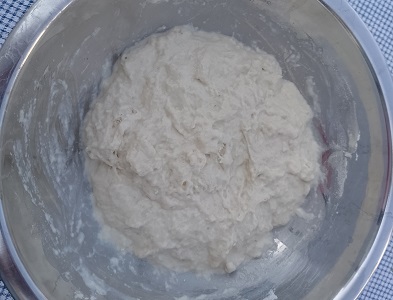
dough with 70% hydration after mixing.
When making bread dough, we deal with various concepts and ingredients. A few are explained here.
hydration
Hydration is the weight ratio of flour to water. 100 grams of flour with 60 grams (ml) of water gives 60% hydration. The more proteine in the flour, the higher the hydration can be to obtain a fine elastic dough. Moreover the hydration has an impact on the baking result. It takes more time to evaporate water in the oven.
High hydrated dough (e.g. over 70%) alows us to skip kneading. It produces a very thin crispy crust and stays fresh longer. Due to the residual moisture, the inside remains extremely tender, soft, with large holes, and almost juicy (without being sticky).
flour strength (W value)
Strength is expressed in the 'W' value. It reflects the flour's capacity to absorb water, build a tight gluten network, and trap gas during long fermentation without collapsing. Strong flour absorbs plenty of water and holds up under long rising.
The W-value is not always shown on the label of the flour. a rule of thumb is that the strength is related to the protein content:
13-15% proteine W-value W270 to W350+ very strong
11-12.5% proteine W-value W180 to W260 moderate strong
9-10.5% proteine W-value W130 to W170 low strength
yeast
Yeast is a micro organism that converts sugars into co2 and a small amount of alcohol. The CO2 ensures the airiness and volume of your bread. The yeast also produces enzymes to convert starch into suger and is the most important source of flavor in bread. During fermentation, yeast produces hundreds of different aromatic substances, acids, and alcohols.
We can use fresh yeast or dry yeast. For our home bakery, dried yeast is the most practical. The amount of dry yeast is a percentage of the flour weight. For various driving strategies, we apply the following:
Short rise: we use 1 to 1.5% yeast
Long rise (24 - 48hrs) 0.1 - 0.2%.
Example: If we make a pizzadough with 300gr flour, we use 0.3 to 0.6 gram dry yeast. This is a tiny pinch, but enough for a 24 hrs risetime.
salt
Salt has a strengthening effect on the proteins in your dough. It ensures that the gluten strands bind together more tightly and compactly. The dough gains structure and elasticity and holds its shape much better.
Salt extracts moisture from the yeast cells via osmosis. This inhibits the activity of the yeast. This sounds negative, but it is essential for controlled rising.
The amount of salt in the dough is a percentage of the flour weight. Usually this is 1.8 - 2.5% for bread. For pizza (2.5) and brioche 2.8 you would target to high salted.
fat
We can add fat (such as olive oil, unsalted butter, lard, or sunflower oil) to dough to completely change the structure, taste, and shelf life of the bread. This is what it does:
It makes the dough softer and more tender.
The bread stays fresh much longer.
Flavor carrier and crispy crust. Fat is a carrier of flavorings.
Better volume with heavy dough
Important: Do not add fat at the beginning of dough preparation, preferably at the end because it works against the quality of the gluten.
bread improvers
There are all kinds of substances that we can add to the dough. They can improve the rising, enhance flavor, color or shelf live. To mention a few:
malt powder: supplies only sugar, aromatic substances, and a dark color to the dough. Diastatic malt flour supplies sugar and especially enzymes (amylase) to a dough.
Ascorbic acid (E300): Vitamin C. Strengthens the gluten. Ensures a light, taller loaf.
Enzymes: Amylase helps the yeast to convert starch to sugar.
Gluten powder: Improves the gluten for a more stretchable dough.
Emulgator: improves the dissolution of fat in the dough (shelf life).
Sugar: dextrose, honey, improves rising and color of the crust.
Mixtures: Available specifically for certain breads, e.g. currant bread.
DOUGH TECHNIQUES:
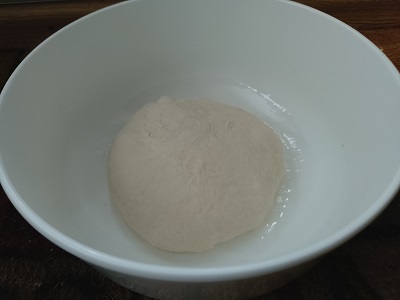
balled-up dough (nedertarwe) 70% hydration, ready for the frige.
There are different techniques we can apply to improve the gluten and create tension in the dough. This is important for the proofing. The purpose is mainly structurize the gluten network and get air into the dough.
covering up
In general, we always cover dough to prevent it from drying out. In a closed container, the air is humid; no drying out will occur. Other methods: on the counter, place an inverted bowl over the dough. Or cover with plastic foil, you have to grease the dough with some oil to preven sticking.
kneading
We knead the dough when it is not too sticky, so usually this is dough of low hydration e.g. 60%.
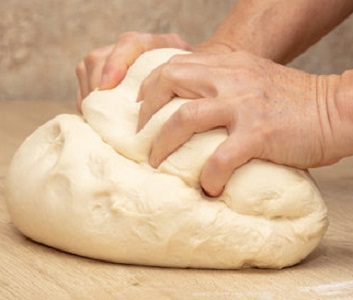
A way tho knead on the workbench is press the dough away from you and then pull it back in such a way that it folds or rolls up. Turn it somewhat and repeat this with your other hand so that the kneading goes in different directions. The kneading takes normally 10 minutes including the mixing time. Do the window pane test to make sure the dough is good. Read the chapters about target temperature.
stretch and fold
This is a way to handle very high hydrated dough that is impossible to knead. There are several ways to do this. It essentially comes down to stretching the dough and folding it back up. This incorporates air into the dough and structures the gluten.
One way to do a stretch and fold session is in the bowl. Make your hand wet, grab the dough at one side, stretch it out and fold it inwards over the rest. Rotate the bowl 45° and repeat for the three other sides.
balling up
When we let the dough rest or rise, we always form it into a ball. When shaping the ball, you pull the outer layer of the dough tightly around the inside. This functions like a kind of balloon.
This tight skin forces the gases produced by the yeast to stay inside the dough. The dough has a memory for the shape so that it does not spread out like a pancake.
We kan make a ball by stretching the sides of the dough somewhat and fold it inside. Do this serveral times until we have a ball with a tight skin. We pinch the seams at the bottom closed and slide the ball back and forth on the seams. We store the ball so that the seams are underneath.
window pane test
We want to test whether our dough has been kneaded sufficiently. One way is to take a piece of dough and stretch it out until it becomes so thin that you can almost see through it. If you manage this without the dough tearing, the kneading is finished.
target temperature
Profesional bakers aim at a certain temperature of the dough when it is kneaded. If your dough is at the perfect temperature (for example, 24°C), you know exactly how quickly it will rise. The yeast then works at a stable, optimal pace.
To control the endtemperature of the dough we can start wit lukewarm or (ice)cold water. Kneading adds warmth.
Especially when we want a long rise, we don't want to get the yeast too active. So we start with cold water then.
On the other hand, a too high doughtemperature can spoil the taste and can couse over-proofing.
over proofing
If we have a high doughtemperature and or we proof in a too high ambient temperature, the result can be that all the fuel for the yeast is used up. Characteristics:
The dough changes from a supple ball into a wet, sticky substance that feels almost like liquid chewing gum or glue.
When you poke the dough, it does not spring back at all. The indentation remains or the dough even sinks further around the indentation.
the fingertest
To monitor the proofing proces, we kan poke a finger into the dough, about 15mm deep. if the dough slowly (partially) springs back, the proof is ready.
Fast springback: not ready and no springback: overproofed.
MIXING
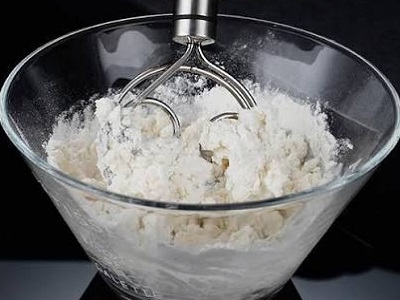
mixing with a Danish dough whisk.
Making dough always starts with mixing the ingredients.
Basically these are water, flour, yeast and salt.
It seems that yeast and salt should be separated but no-one seems to worry about that these days. We can put all components in a bowl and stir it until all flour is absorbed.
autolyse
After mixing we can let the mass sit for 1/2 hr (autolyse). During this time the following happens:
Two specific proteins in the wheat (gliadin and glutenin) change as soon as they come into contact with water. They begin to bind to each other on their own to form gluten. Autolysis therefore actually does the initial, heavy kneading work for you, simply by resting.
During autolysis, natural enzymes (proteases) in the flour are activated. These enzymes slightly loosen the initial tight gluten bonds. This sounds negative, but it is essential: it makes the dough extremely elastic.
Less stickiness, more control: If you were to pull on the dough immediately after mixing, the dough would tear and stick to your hands like glue. After the 30-minute autolysis, you will notice that the flour has neatly absorbed all the water and that the dough suddenly feels much smoother, more cohesive, and less sticky.
With an official autolyse, we mix only flour and water. After 1/2 hr we add the yeast and salt. Salt extracts moisture and inhibits the enzymes, and yeast starts fermentation too early.
NO KNEADING
pre-ferments poolish (left) and biga.
We can make very good dough for bread and pizza without kneading. We let time and "stretch and fold" techniques do the job. Usually we do this with a dough of high hydration that is impossible to knead. The stretch and fold helps the gluten strength and brings air into the dough.
example 1: bread and pizza
We use a flour of 12.5% protein and we target to 70% hydration. After the mixing, we put the dough right away in the refridgerator. And let it sit there overnight. The next day we take the dough and stretch it out to a large thin slab. Now we fold the slab together until we have a format of which we can form a ball. For a bread we can let it proof, and for pizza we make several smaller balls. We let them proof 4 hrs at room temperature.
example 2: bread and pizza
We use a flour of 12.5% protein and we target to 70% hydration. After the mixing, We leave the dough alone for half an hour. Then we will do 4 stretch and fold sessions with intervals of 20 to 30 minutes.
After the last stretch and fold session we can form a ball (for pizza form smaller balls) and put that in the refridgerator for the long rise.
example 3: focaccia
We use a flour of 12.5% protein and we target to 75% hydration. After the mixing, We leave the dough alone for half an hour. Then we will do 4 stretch and fold sessions with intervals of 20 to 30 minutes.
After the last stretch and fold session we can form a ball and put that in the refridgerator for the long rise.
KNEADING:
kneading dough by hands
We cannot stretch and fold dough of lower hydration, e.g. 50-65%. But this is not sticky and can therefore be kneaded. The purpose is to develop the gluten and bring air in the dough.
Usually with bread that requires a fine, tender, and uniform texture we cannot skip the kneading. Examples: White loaf, casino bread. milk bread, brioche and soft luxury rolls (raisin buns, milk rolls).
In general all dough that has a low hydration has to be kneaded. When it must support a filling, such as currants, raisins, minced meat, etc. it should be a tough dough with low hydration.
target temperature
Kneading adds heat to the dough. If we aim for a final temperature of 24°c, we must take this into account. For example, by starting with ice-cold water. We can also interrupt the kneading to allow the dough to cool off in the refrigerator.
PROOFING
nicely risen breaddough, ready for oven.
We allow bread dough to ferment (rise or proof), we leave it at an ambient temperature well above 20°C; ideal is 25°C to 28°C.
We do this for three crucial reasons: to create volume and airiness, to develop flavor and aroma, and to strengthen the dough structure. During fermentation, microorganisms (such as yeast cells or lactic acid bacteria) convert the sugars and starch present in the flour into other substances. This biological process is called fermentation. These are the main functions of fermentation:
Volume and an airy structure. When the yeast consumes the sugars, it produces carbon dioxide (CO?) and alcohol. The gas formed creates thousands of tiny air bubbles in the dough. Because the dough is elastic, these bubbles stretch, causing the dough to double in volume. During baking, the alcohol evaporates and the gas expands even further, resulting in a soft and airy loaf. Without this process, the result would be a hard, flat, and compact lump of dough.
Flavor and aroma development. Yeast not only produces gas but also leaves behind organic acids, alcohols, and esters in the dough. These by-products give bread its characteristic, full bread flavor and delicious aroma.
Short fermentation: Results in a relatively neutral or mild taste.
Slow/long fermentation: Produces more complex aromas. For example, in sourdough bread, the acids create a mild, yogurt-like or, conversely, a sharper, vinegary taste.
Strengthening and softening of the dough:
Kneading the dough creates a network of gluten (proteins). The gas produced by the yeast gently pushes against these gluten strands from the inside. This causes the gluten network to stretch and become more flexible without tearing. As a result, the dough can hold air bubbles well and the bread does not collapse in the oven.
Better digestibility
During longer fermentation, the yeast cells and enzymes partially break down certain substances in the flour, such as complex carbohydrates and phytic acid. This makes the final bread easier to digest for our stomach and intestines, and ensures that our body can absorb minerals better.
We can have a short rise (several hrs) or a long rise, >24hrs.
Short rise
We start with lukewarm water and the dough is ready to bake within several hours. It creates a very uniform, fine, and compact structure with lots of small, uniform air bubbles. The taste is mild, neutral, and sometimes recognizable as a 'yeast-like' flavor. There is simply no time for the development of complex flavorings.
long rise
Creates a looser, wilder structure with both large and small holes (like a French baguette or ciabatta). The crust often becomes crispier and develops nicer bubbles after baking.
The flavor is much deeper, fuller, and more complex. Bacteria in the dough have time to produce lactic and acetic acids. This results in a rich aroma and (in the case of sourdough) that typical, slightly Rinse taste.
A long fermentation process also results in a longer shelf life, better digestibility, and better dough handling.
sourdough
With sourdough, we allow natural yeasts and other microorganisms to go about their business spontaneously. The result is a somewhat less airy bread with a typical sour taste.
yeast
By adding cultured yeast, this yeast immediately becomes the dominant micro-organism in the dough. The rising process is much faster, preventing the development of lactic acid.
A long rise combines both sourdough and yeast somewhat.
proofing test
In many recipes you have to let the dough rise until doubled on volume. This is somtimes hard to determine, so what jou can do is this. Take a tall, narrow glass and put some of the dough in. Mark the level. After some time is is possible to judge if the volume has doubled.
RECEIPES
no knead pizzadough 70% hydration
500gr flourwith 12.5% protein, 350gr room temperature tapwater, 10gr salt, 0,4gr dry yeast.
Mix flour yeast and salt well, add water and mix until all flower is absorbed and let it sit 30min. Then do 4 stretch and fold sets with 30-minute intervals. Ball-up and put in the fridge. The next day, stretch the dough out into a large sheet and fold it up to the size of your dough ball. Ball-up and let it sit 15 minutes at roomtemperature. Than devide into pizza portions, stretch and fold the pizza portion a few times, ball them up and let them proof 4 hrs. remark: for beginners this might be challenging as this dough is very sticky. You can try this with less water e.g. 325gr (65% hydration).
pizzadough 65% hydration
500gr flour with 12.5% protein, 325 gr room temperature tapwater, 10gr salt, 0,4gr dry yeast.
Mix flour yeast and salt well, add water and mix until all flower is absorbed and let it sit 30min. Then knead 7 minutes and do the window pane test. Let rest 15 minutes and divide into pizza portions. Ball them up and put in the fridge.
The next day, put the pizzaballs out of the fridge, 3-4 hrs before baking so that they can proof.
no knead bread 70% hydration
500gr flour with 12.5% protein, 350gr room temperature tapwater, 10gr salt, 0,4 gr dry yeast.
Mix flour yeast and salt well, add water and mix until all flower is absorbed, than let it sit 30min. Then do 4 stretch and fold sets with 30-minute intervals. Ball-up and put in the fridge. The next day, stretch the dough out and fold it back into a ball. Ball-up and let proof 2-3hrs.